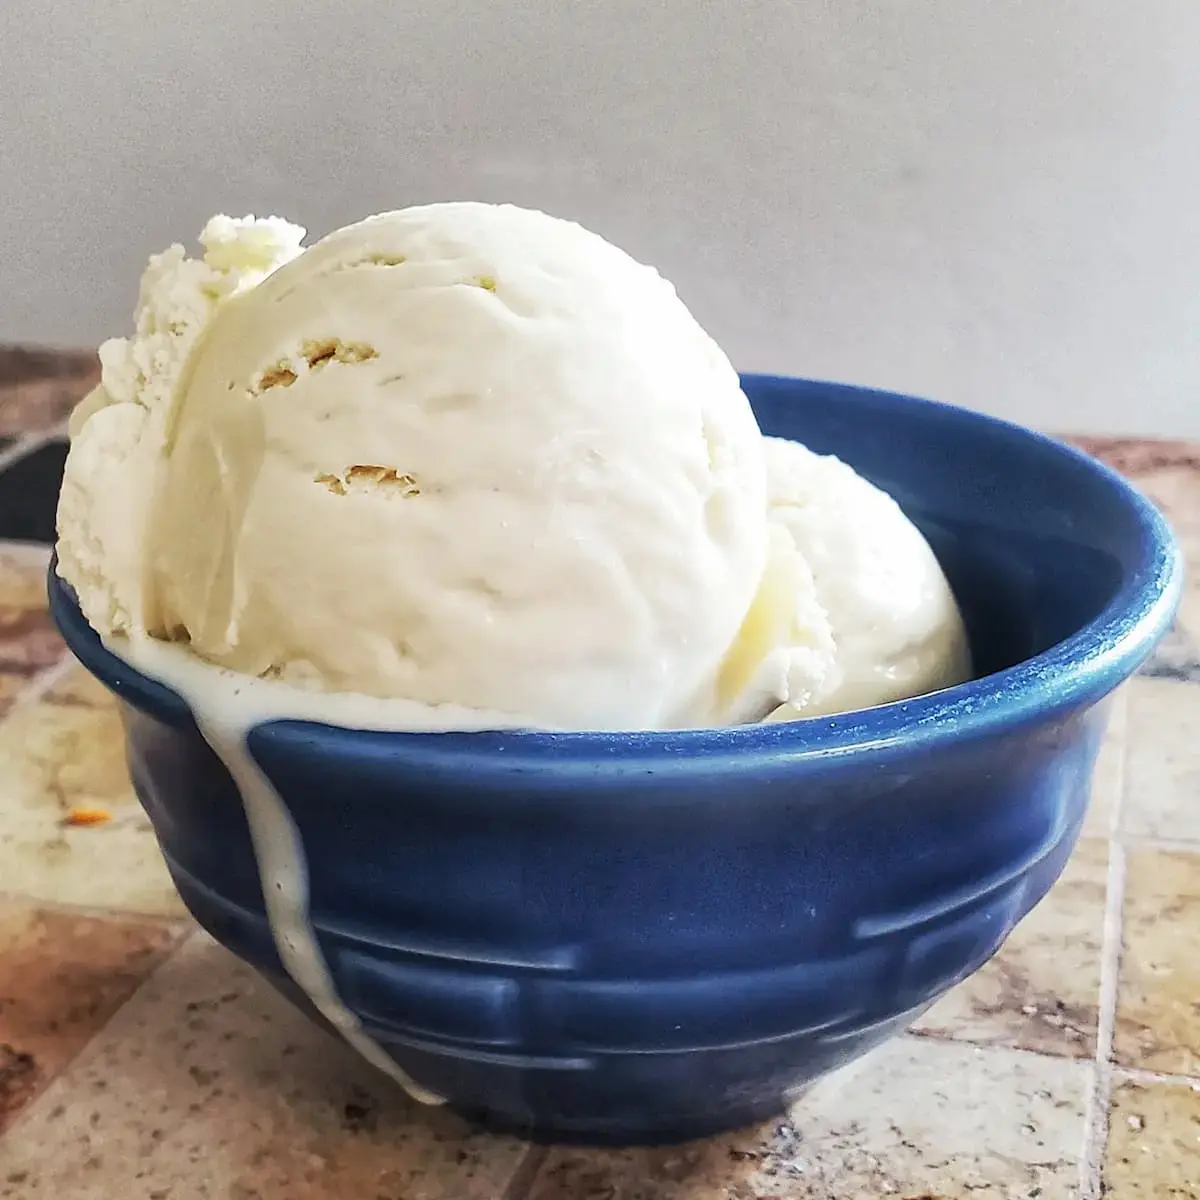
Real food means knowing exactly what goes into your dessert. This homemade vanilla ice cream uses honest ingredients like heavy cream and egg yolks for a traditional frozen treat your family will love. In just 40 minutes of hands-on time, you'll create a smooth, delicious custard that needs only a few hours to chill before it's ready for your ice cream maker. This is the base I use for all of my ice cream recipes.
Jump To What You Need
The Ice Cream Maker I Use
I have a Kitchen Aid ice cream maker attachment for my Kitchen Aid mixer. One of the best presents I have ever received. It has a bowl that fits into your freezer, a simple churn, and a consistent texture.
Why You Will Love This Recipe
- Authentic Custard Base This recipe uses a traditional egg-yolk custard to create a dense, rich texture that is typical of high-end, artisan ice cream. This base is used with all of my ice cream recipes.
- Pure Vanilla Flavor Without the artificial stabilizers or gums found in store-bought tubs, the natural aroma of the vanilla shines through clearly.
- Nostalgic Homemade Taste Every bite is a tribute to simpler times and the joy of a treat made from scratch in your own kitchen.
- Honest Ingredients You have full control over what goes into your bowl, using real cream, sugar, and eggs for a real life dessert you can feel good about serving.
- Unmatched Creaminess The process of tempering the eggs and straining the base ensures a silky-smooth finish that feels luxurious on the palate.
Ingredients for the Homemade Ice Cream
- Heavy Whipping Cream & Half and Half These provide the fat content necessary for a smooth mouthfeel.
- Egg Yolks These act as an emulsifier, binding the water and fat for a dense, creamy texture.
- Fine Sea Salt A small amount of salt enhances the sweetness and rounds out the vanilla profile.
- Vanilla Extract High quality pure vanilla extract brings home the taste of summer any time of the year.
How to Make The Best Homemade Vanilla Ice Cream
- Combine Bases In a medium saucepan, whisk the sugar, heavy cream, half and half, and salt over medium heat.
- Heat Gently Stir the mixture until the sugar is gone and the liquid reaches 160 degrees.
- Temper Yolks Place your beaten yolks in a bowl. Slowly pour one-third of the hot cream into the yolks while whisking fast to keep them smooth.
- Thicken Custard Pour the yolk mixture back into the saucepan. Keep whisking over medium heat until it is thick enough to coat a spoon.
- Refine Pour the custard through a fine-mesh sieve into a clean bowl to remove any tiny bumps.
- Flavor Stir in the vanilla extract.
- Chill Let it cool slightly, then press plastic wrap directly onto the liquid. Chill in the fridge for at least three hours.
- Churn Pour the cold base into your maker and follow the manufacturer's settings.
Tempering the Egg Yolks for the Ice Cream Custard
- Prepare the Yolks Start with your six well-beaten egg yolks in a medium bowl. Ensure the bowl is large enough to eventually hold about a third of your hot cream mixture.
- Heat the Base In a separate pan, whisk together your sugar, cream, half and half, and salt over medium heat. Bring this liquid to approximately 160°F.
- The Slow Pour While whisking the egg yolks constantly, slowly pour about ⅓ of the hot cream mixture into the yolk bowl.
- Gradual Warming By adding the hot liquid slowly and keeping the eggs moving, you raise their temperature gradually. This prevents the eggs from scrambling or forming lumps when they hit the heat.
- Combine and Thicken Once the yolks are tempered, pour the entire egg and cream mixture back into the main saucepan.
- Finish the Custard Continue to whisk the combined mixture over medium heat until it is thick enough to coat the back of a spoon. This usually takes about 10 to 15 minutes.
- Strain (optional) If you see any tiny white or yellow bits after tempering, do not worry. Straining the custard through a sieve right after cooking will remove any small imperfections and keep your ice cream silky.
Common Challenges and Solutions When Making the Ice Cream
- Scrambled Eggs in the Base This happens if the hot milk mixture is added to the egg yolks too quickly. To fix this, always whisk the yolks constantly while pouring the hot liquid in a very slow, steady stream.
- The Custard Isn't Thickening If the mixture won't coat the back of a spoon after 15 minutes, your heat might be too low. Maintain a steady medium heat and keep whisking until it reaches the right consistency.
- Icy Texture Ice cream becomes icy if it freezes too slowly or if the base wasn't cold enough before churning. Always chill your custard for at least 3 hours, or preferably overnight, before putting it in the machine.
- Grainy or Gritty Feel This is usually caused by undissolved sugar or small bits of cooked egg. Straining the custard through a fine-mesh sieve is a vital step to ensure a silky-smooth texture.
- Forgetting to Freeze the Bowl If you use an attachment like the KitchenAid ice cream maker, the bowl must be completely frozen (usually 15-24 hours). If it isn't cold enough, the liquid will never turn into ice cream.
- Overheating the Milk If the milk and cream mixture boils, it can scald or change the flavor of the dairy. Keep a close eye on the temperature and aim for about 160°F.
- Skipping the Plastic Wrap If you don't press the plastic wrap directly onto the surface of the custard while it cools, a tough "skin" will form on top.
- Adding Vanilla Too Early Adding vanilla extract to the boiling milk can cause the flavor to evaporate. Always stir it in after the custard has been removed from the heat and strained.
I hope you and your family enjoy the vanilla ice cream recipe! Try our bananas foster ice cream recipe, pumpkin pie ice cream, or caramel apple ice cream !
Try my whipped peanut butter frosting for the cake you are making the ice cream for.
FAQ's:
Tempering the eggs is an important step to prevent them from scrambling when you add them to the hot cream mixture. By slowly whisking a small amount of the hot liquid into the egg yolks first, you gradually raise their temperature, allowing them to be fully incorporated into the custard without cooking into lumps.
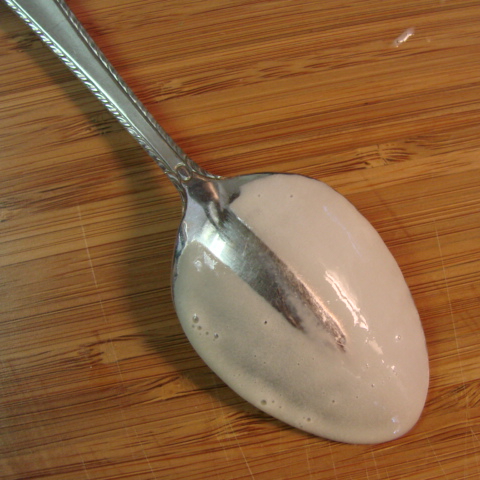
The custard is ready when it is thick enough to coat the back of a spoon. To test this, dip a spoon into the custard and then run your finger down the back of the spoon. If the line you draw holds without the custard running, it is thick enough.
Join My Email List!
Get no-fuss recipes and real-world kitchen skills sent straight to your inbox.
Straining the custard through a sieve is recommended to remove any small bits of scrambled egg or other lumps that may have formed. This extra step ensures your final ice cream has a silky-smooth texture.
For the creamiest texture, it is best to stick to the heavy whipping cream and half and half as specified in the recipe. Substituting with lower-fat dairy products may result in an icier texture.
Homemade ice cream is best enjoyed within the first week for the creamiest texture and flavor. Stored in an airtight container, it can last up to one month, but it may become icier over time.
Want to save or adapt this recipe using AI? Use the buttons below.
Recipe
Easy Creamy Homemade Vanilla Ice Cream
Ingredients
- 2 cups heavy whipping cream
- 1 cup half and half
- ¾ cup sugar
- ⅛ teaspoon of fine sea salt
- 1 teaspoon of vanilla extract
- 6 well beaten egg yolks
Method
- In a medium saute pan combine sugar, whipping cream, half and half, and salt.
- Over medium heat whisk the milk mixture until the sugar dissolves and is hot to the touch. Around 160 degrees.
- Whisking as you are pouring, pour about ⅓ of the milk mixture into a separate bowl with the beaten egg yolks. This is tempering the egg mixture.
- Then pour tempered egg mixture back into the pan with the milk mixture and continue whisking.
- Whisk mixture over medium heat until it is thick enough to coat the back of a wooden spoon. Around 10-15 minutes.
- Strain custard through a sieve to get the lumps out.
- Mix vanilla into the sieved custard and let cool.
- Once cooled place a piece of plastic wrap onto the surface of custard to avoid a “skin” forming.
- Place in the fridge and cool overnight or for at least 3 hours. Then follow the directions provided by your ice cream maker manufacturer.
Leave a Reply
You must be logged in to post a comment.